We wish all phones came with unlimited storage out of the box, but at least many Android phones have the option to expand that storage with microSD cards.
We wish all phones came with unlimited storage out of the box, but at least many Android phones have the option to expand that storage with microSD cards. Not every phone supports a microSD card — looking at you, Google Pixel 4 — but for those that do, the microSD card can give you more space for your app data, your music and movies, and, of course, your photos! That said, you can only reap these benefits if you take the time to set up your device to take advantage of it.
Products used in this guide
Best card for photography: Samsung 256GB EVO Select microSD ($50 at Amazon)
Third-party file manager: Solid Explorer File Manager (Free w/IAPs at Google Play Store)
How to change directories in the camera app
Your camera app picks a spot to save photos based on the available storage. In most cases, the default is typically the phone itself. Changing that will make your life a lot easier, especially after you have a microSD card installed.
This will ensure that any new photos you take are automatically stored to the microSD card rather than internal storage.
Note: these steps are taken from the Samsung Galaxy Note 9 and Samsung Camera app, but the steps should be more or less the same on most devices that include a microSD slot.
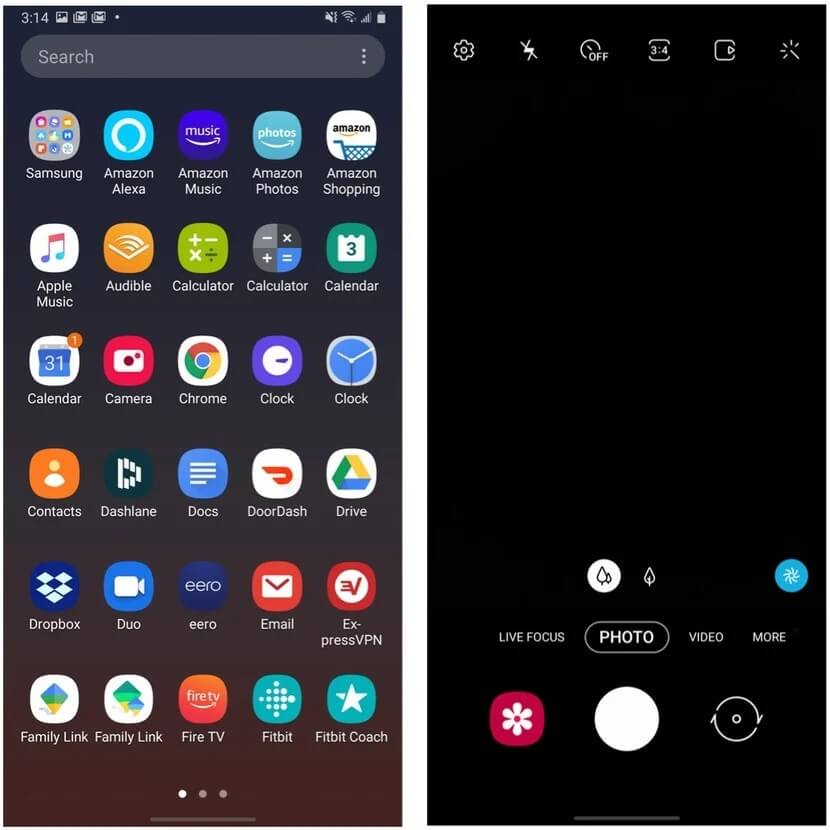
1. Open your Camera app.
2. Tap Settings (the gear icon).

Source: Android Central
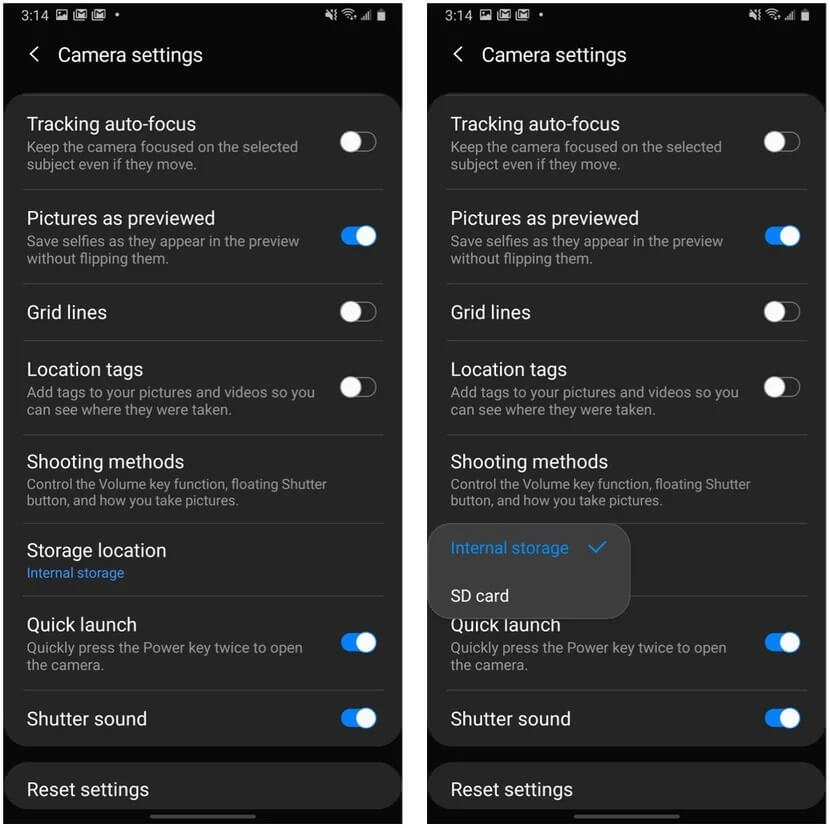
3. Scroll down and tap Storage location.
4. Tap SD card.

Source: Android Central
Now the camera app will send newly taken photos to the microSD card. What about all the photos you’ve already taken that are taking up storage space on your internal storage? We need to move those over to the microSD card.
How to move photos you’ve already taken to a microSD card
To move files from internal storage to the microSD card, we’ll need a file manager app. Some phones come with file manager apps already installed, like Samsung’s My Files app, but if yours doesn’t, there are plenty of third-party apps that will work like Solid Explorer. We’ve used the Samsung My Files for these steps on a Samsung Galaxy Note 9, but the steps should be the same on most devices.
1. Open your file manager app.
2. Open Internal Storage.
3. Open DCIM (short for Digital Camera Images).
Source: Android Central
4. Long-press Camera.
5. Tap the Move button at the bottom left of the screen.
6. Navigate back to your file manager menu, and tap on SD card.
7. Tap DCIM. If a DCIM folder isn’t on your SD card, tap Create folder and make a DCIM folder.
8. Tap Done to initiate the transfer.
Time for more photos
Once your photos are set up, you can snap away, content in the knowledge that you don’t be filling your internal storage to the brim and bogging down your phone. It is also worth mentioning, however, that while it’s easy to assign camera photos to go to the microSD card, on many phones, you cannot reassign screenshots to capture to SD the same way. Be sure to come back now and then and copy your screenshots over to SD to keep them from filling up your phone. You can also back up everything with Google Photos if you’d prefer.


Comments